手部检测
1、简介
MediaPipe是⼀款由Google开发并开源的数据流处理机器学习应⽤开发框架。它是⼀个基于图的数据处理管线,⽤于构建使⽤了多种形式的数据源,如视频、⾳频、传感器数据以及任何时间序列数据。MediaPipe是跨平台的,可以运⾏在嵌⼊式平台(树莓派等),移动设备(iOS和Android),⼯作站和服务器上,并⽀持移动端GPU加速。 MediaPipe为实时和流媒体提供跨平台、可定制的ML解决⽅案。MediaPipe 的核⼼框架由 C++ 实现,并提供 Java 以及 Objective C 等语⾔的⽀持。MediaPipe 的主要概念包括数据包(Packet)、数据流(Stream)、计算单元(Calculator)、图(Graph)以及⼦图(Subgraph)。
MediaPipe的特点:
端到端加速:内置的快速ML推理和处理即使在普通硬件上也能加速。
⼀次构建,随时随地部署:统⼀解决⽅案适⽤于Android、iOS、桌⾯/云、web和物联⽹。
即⽤解决⽅案:展⽰框架全部功能的尖端ML解决⽅案。
免费开源:Apache2.0下的框架和解决⽅案,完全可扩展和定制。
2、MediaPipe Hands
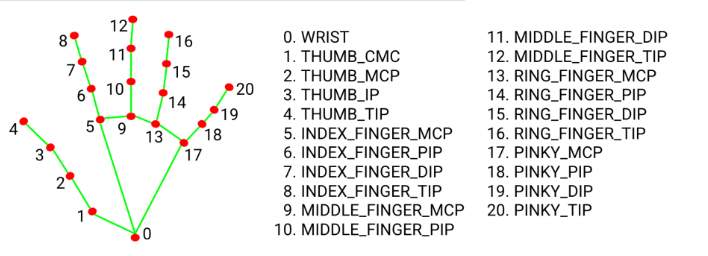
MediaPipe Hands是⼀款⾼保真的⼿和⼿指跟踪解决⽅案。它利⽤机器学习(ML)从⼀帧中推断出21个⼿的3D坐标。
在对整个图像进⾏⼿掌检测后,根据⼿部标记模型通过回归对检测到的⼿区域内的21个3D⼿关节坐标进⾏精确的关键点定位,即直接坐标预测。该模型学习⼀致的内部⼿姿势表⽰,甚⾄对部分可⻅的⼿和⾃我遮挡也具有鲁棒性。
为了获得地⾯真实数据,⽤了21个3D坐标⼿动注释了约30K幅真实世界的图像,如下所⽰(从图像深度图中获取Z值,如果每个对应坐标都有Z值)。为了更好地覆盖可能的⼿部姿势,并对⼿部⼏何体的性质提供额外的监督,还绘制了各种背景下的⾼质量合成⼿部模型,并将其映射到相应的3D坐标。
3、手部检测
3.1、启动
进入docker容器后,终端输入,
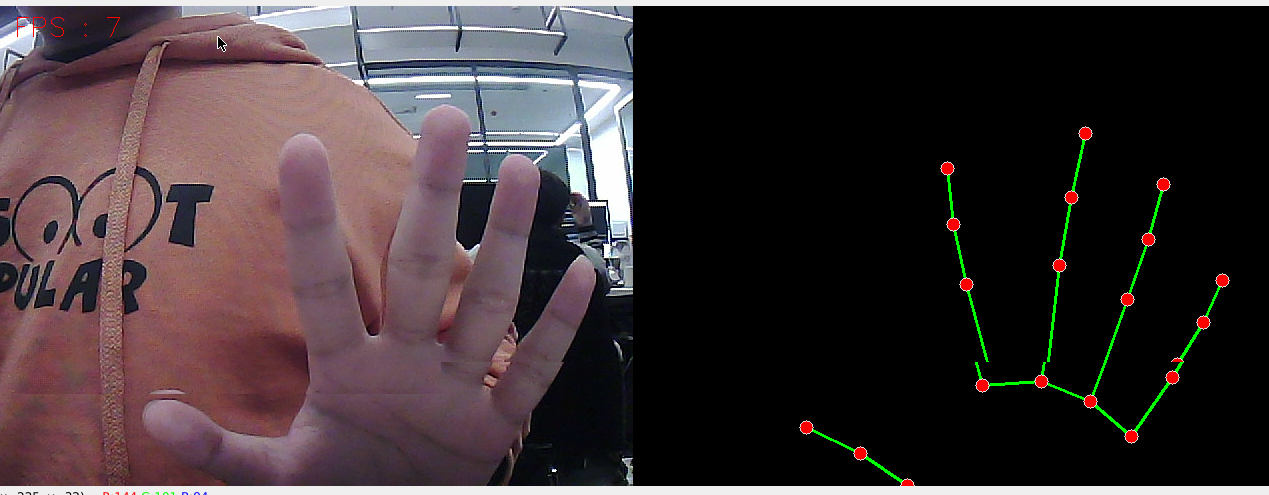
ros2 run yahboomcar_mediapipe 01_HandDetector
3.2、代码解析
进入docker容器后,该功能源码的位置位于,
xxxxxxxxxx/root/yahboomcar_ws/src/yahboomcar_mediapipe/yahboomcar_mediapipe/01_HandDetector.py
x#!/usr/bin/env python3# encoding: utf-8import rospyimport timeimport cv2 as cvimport numpy as npimport mediapipe as mpfrom geometry_msgs.msg import Pointfrom yahboomcar_msgs.msg import PointArray
class HandDetector: def __init__(self, mode=False, maxHands=2, detectorCon=0.5, trackCon=0.5): self.mpHand = mp.solutions.hands self.mpDraw = mp.solutions.drawing_utils self.hands = self.mpHand.Hands( static_image_mode=mode, max_num_hands=maxHands, min_detection_confidence=detectorCon, min_tracking_confidence=trackCon ) self.pub_point = rospy.Publisher('/mediapipe/points', PointArray, queue_size=1000) self.lmDrawSpec = mp.solutions.drawing_utils.DrawingSpec(color=(0, 0, 255), thickness=-1, circle_radius=6) self.drawSpec = mp.solutions.drawing_utils.DrawingSpec(color=(0, 255, 0), thickness=2, circle_radius=2)
def pubHandsPoint(self, frame, draw=True): pointArray = PointArray() img = np.zeros(frame.shape, np.uint8) img_RGB = cv.cvtColor(frame, cv.COLOR_BGR2RGB) self.results = self.hands.process(img_RGB) if self.results.multi_hand_landmarks: ''' draw_landmarks():在图像上绘制地标和连接。 image: 表示为numpy ndarray的三通道RGB图像。 landmark_list: 要在图像上注释的规范化地标列表原始消息。 connections: 地标索引元组列表,指定如何在绘图中连接地标。 landmark_drawing_spec: 用于指定地标的绘图设置,例如颜色、线条粗细和圆半径。 connection_drawing_spec: 用于指定连接的绘图设置,例如颜色和线条粗细。 ''' for i in range(len(self.results.multi_hand_landmarks)): if draw: self.mpDraw.draw_landmarks(frame, self.results.multi_hand_landmarks[i], self.mpHand.HAND_CONNECTIONS, self.lmDrawSpec, self.drawSpec) self.mpDraw.draw_landmarks(img, self.results.multi_hand_landmarks[i], self.mpHand.HAND_CONNECTIONS, self.lmDrawSpec, self.drawSpec) for id, lm in enumerate(self.results.multi_hand_landmarks[i].landmark): point = Point() point.x, point.y, point.z = lm.x, lm.y, lm.z pointArray.points.append(point) self.pub_point.publish(pointArray) return frame, img
def frame_combine(slef,frame, src): if len(frame.shape) == 3: frameH, frameW = frame.shape[:2] srcH, srcW = src.shape[:2] dst = np.zeros((max(frameH, srcH), frameW + srcW, 3), np.uint8) dst[:, :frameW] = frame[:, :] dst[:, frameW:] = src[:, :] else: src = cv.cvtColor(src, cv.COLOR_BGR2GRAY) frameH, frameW = frame.shape[:2] imgH, imgW = src.shape[:2] dst = np.zeros((frameH, frameW + imgW), np.uint8) dst[:, :frameW] = frame[:, :] dst[:, frameW:] = src[:, :] return dst
if __name__ == '__main__': rospy.init_node('handDetector', anonymous=True) capture = cv.VideoCapture(4) capture.set(6, cv.VideoWriter.fourcc('M', 'J', 'P', 'G')) capture.set(cv.CAP_PROP_FRAME_WIDTH, 640) capture.set(cv.CAP_PROP_FRAME_HEIGHT, 480) print("capture get FPS : ", capture.get(cv.CAP_PROP_FPS)) pTime = cTime = 0 hand_detector = HandDetector(maxHands=2) while capture.isOpened(): ret, frame = capture.read() # frame = cv.flip(frame, 1) frame, img = hand_detector.pubHandsPoint(frame, draw=False) if cv.waitKey(1) & 0xFF == ord('q'): break cTime = time.time() fps = 1 / (cTime - pTime) pTime = cTime text = "FPS : " + str(int(fps)) cv.putText(frame, text, (20, 30), cv.FONT_HERSHEY_SIMPLEX, 0.9, (0, 0, 255), 1) dist = hand_detector.frame_combine(frame, img) cv.imshow('dist', dist) #cv.imshow('frame', frame) # cv.imshow('img', img) capture.release() cv.destroyAllWindows()