1. 系统配置与驱动安装
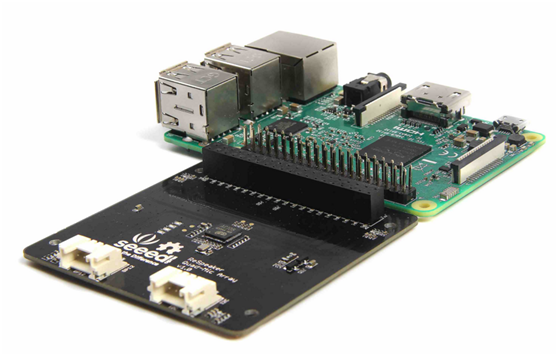
step 1. 把ReSpeaker 4-Mics Pi HAT插入到Raspberry Pi
把 ReSpeaker 4-Mics Pi HAT 插入到 Raspberry Pi, 确保插入Raspberry Pi的时候针脚对齐。
Note
不要在上电的时候,热插拔ReSpeaker 4-Mics Pi HAT.


step 2. 烧录系统,登陆,换源
因为当前的Pi内核目前不支持wm8960编解码器,所以我们需要手动构建。
1. 确保您正在您的Pi上运行2019-09-26之前的树莓派官方系统。 您可以用烧录工具进行系统烧录
2. 您可以用 VNC或者PUTTY连接树莓派,但之前请配置好wifi
3. 在安装驱动之前,请先打开SPI通讯服务,并根据以下流程切换源到清华。
pi@raspberrypi ~ $ sudo nano /etc/apt/sources.list
用#注释掉原文件内容,用以下内容取代:
deb http://mirrors.tuna.tsinghua.edu.cn/raspbian/raspbian/ buster main non-free contrib
deb-src http://mirrors.tuna.tsinghua.edu.cn/raspbian/raspbian/ buster main non-free contrib
如果是2019-06-20之前版本 需要将buster修改为Stretch,可以通过cat /etc/rpi-issue查看是什么时候发布的版本。
最新的树莓派系统内核版本过高,暂时无法安装驱动。
step 3. 驱动下载并安装
运行下面命令
sudo apt-get update
sudo apt-get upgrade
git clone https://github.com/respeaker/seeed-voicecard.git
cd seeed-voicecard #下载声卡驱动
sudo ./install.sh --compat-kernel #安装声卡驱动
sudo reboot #重启
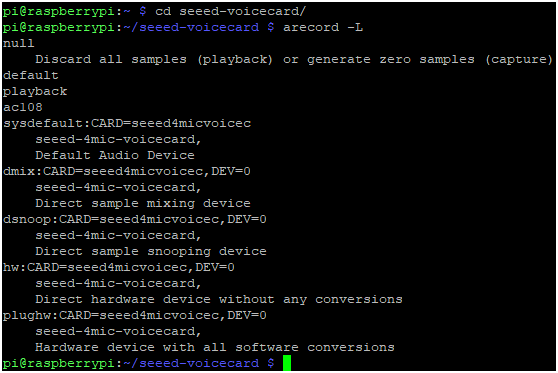
step 4. 检查声卡名称是否与源代码seeed-voicecard相匹配.
pi@raspberrypi:~/seeed-voicecard $ arecord -L
null
Discard all samples (playback) or generate zero samples (capture)
playback
capture
dmixed
array
ac108
default:CARD=seeed4micvoicec
seeed-4mic-voicecard,
Default Audio Device
sysdefault:CARD=seeed4micvoicec
seeed-4mic-voicecard,
Default Audio Device
dmix:CARD=seeed4micvoicec,DEV=0
seeed-4mic-voicecard,
Direct sample mixing device
dsnoop:CARD=seeed4micvoicec,DEV=0
seeed-4mic-voicecard,
Direct sample snooping device
hw:CARD=seeed4micvoicec,DEV=0
seeed-4mic-voicecard,
Direct hardware device without any conversions
plughw:CARD=seeed4micvoicec,DEV=0
seeed-4mic-voicecard,
Hardware device with all software conversions

如果要更改alsa设置,可以使用sudo alsactl --file=ac108_asound.state store保存。 当你需要再次使用这些设置时,将它复制到:sudo cp ~/seeed-voicecard/ac108_asound.state /var/lib/alsa/asound.state
2. 录音播放测试
step 1. 录播测试
可以用arecord录制,然后用aplay播放:(耳机或者喇叭插入到树莓派的3.5mm音频接口):
arecord | aplay
也可以通过audacity软件测试。打开Audacity后,选择 seeed-4mic-voicecard和2通道 作为输入,bcm2835 alsa 作为输出来测试:
$ sudo apt update
$ sudo apt install audacity
$ audacity // 运行 audacity,只有在图形桌面才可以运行

step 2. 调节音量(可跳过)
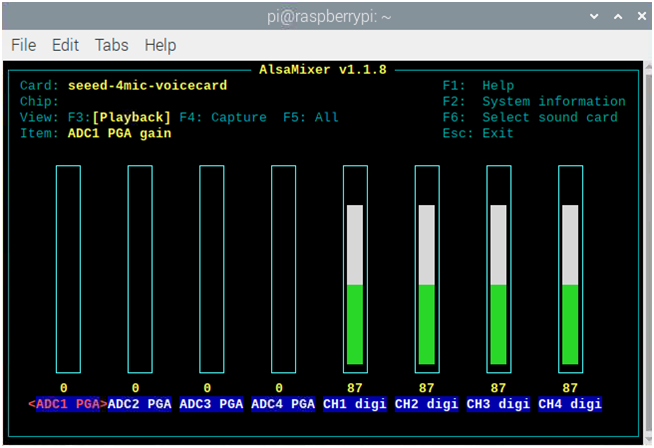
alsamixer 是用于配置声音设置和调整音量,高级Linux声音体系结构(ALSA)的图形混音器程序。
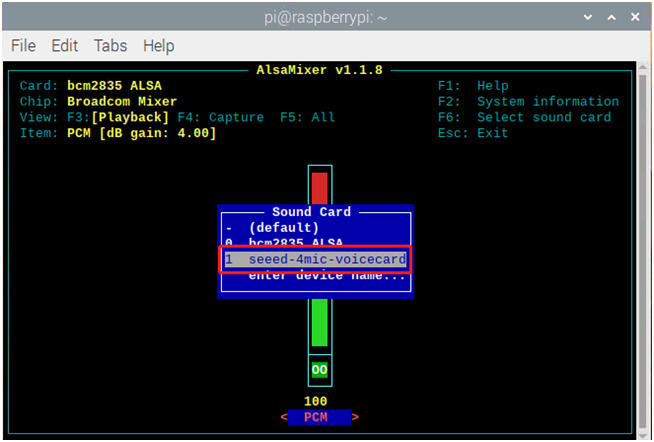
pi@raspberrypi:~ $ alsamixer
首先请用F6选择seeed-4mic的声卡设备。


Note
左和右箭头键用于选择通道或设备,“向上和向下箭头”控制当前所选设备的音量。 退出程序使用ALT + Q或按Esc键。 More information
3. 安装python和虚拟环境
这样是是为了隔离SDK与系统Python包关系。
pi@raspberrypi:~ $ cd /home/pi
pi@raspberrypi:~ $ git clone https://github.com/respeaker/4mics_hat.git
pi@raspberrypi:~ $ cd /home/pi/4mics_hat
pi@raspberrypi:~/4mics_hat $ sudo apt install python-virtualenv # 安装 python2 虚拟环境工具
pi@raspberrypi:~/4mics_hat $ virtualenv --system-site-packages ~/env # 建立虚拟环境,命名位env,放在~目录下
pi@raspberrypi:~/4mics_hat $ source ~/env/bin/activate # 激活虚拟环境
# 安装需要的工具包
(env) pi@raspberrypi:~/4mics_hat $ cd ~
(env) pi@raspberrypi:~ $ pip install spidev gpiozero
(env) pi@raspberrypi:~ $ sudo pip install rpi.gpio
(env) pi@raspberrypi:~ $ git clone --depth 1 https://github.com/respeaker/pixel_ring.git
(env) pi@raspberrypi:~ $ cd pixel_ring
(env) pi@raspberrypi:~/pixel_ring $ pip install -U -e .